![](https://cplab.blog/wp-content/themes/cocoon-master/images/b-woman.png)
前回のコードの中で、繰り返し処理が出てきました。
今回は繰り返し処理についてお伝えします!
![](https://cplab.blog/wp-content/themes/cocoon-master/images/b-man.png)
よろしくお願いします!
前回のコードについて
![](https://cplab.blog/wp-content/themes/cocoon-master/images/b-woman.png)
まずは前回のコードをおさらいしてみましょう。
%matplotlib inline
import matplotlib.pyplot as plt
from sklearn import datasets
# 手書きの数字のデータを読み込む
x = datasets.load_digits()
# 手書きの数字のデータを画面に表示する
for i in range(10):
plt.subplot(2, 5, i+1)
plt.axis("off")
plt.title(str(x.target[i]))
plt.imshow(x.images[i], cmap="gray")
plt.show()
![](http://cplab.blog/wp-content/uploads/2022/05/スクリーンショット-2022-05-31-21.18.14-1024x478.png)
![](https://cplab.blog/wp-content/themes/cocoon-master/images/b-man.png)
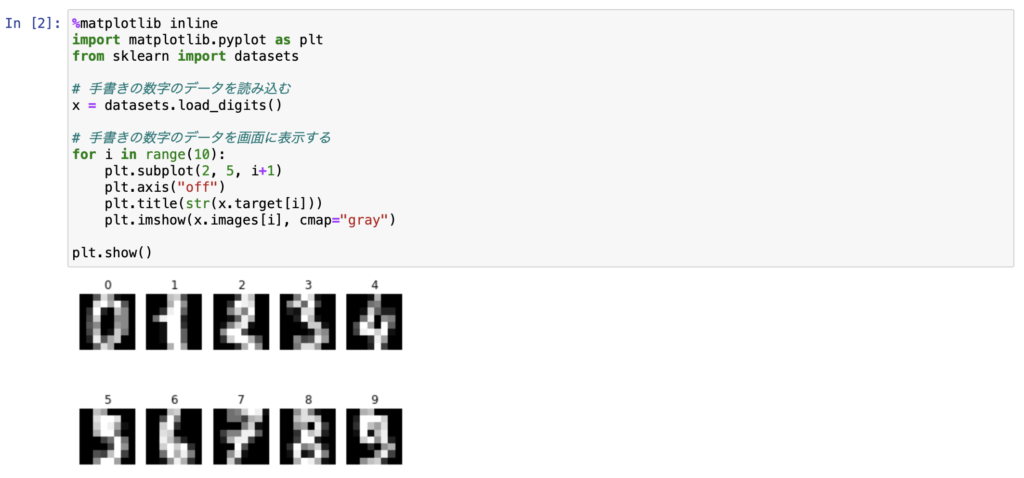
「%matplotlib inline」は、Jupyter NotebookでMatplotlibライブラリを使うときに必要な文ですね。
「import matplotlib.pyplot as plt」と「from sklearn import datasets」は、それぞれ、MatplotlibライブラリとScikit-learnライブラリの中のdatasetsモジュールを読み込むための文ですね。
![](https://cplab.blog/wp-content/themes/cocoon-master/images/b-woman.png)
その通りです!
![](https://cplab.blog/wp-content/themes/cocoon-master/images/b-man.png)
それから、#で始まるコメントアウトがあって、手書きの数字のデータセットを読み込む「x = datasets.load_digits()」の文を書きました。
![](https://cplab.blog/wp-content/themes/cocoon-master/images/b-woman.png)
そうでしたね。
そして、その下に繰り返しの処理があることまでは前回お伝えしましたね。
![](https://cplab.blog/wp-content/themes/cocoon-master/images/b-man.png)
はい!
![](https://cplab.blog/wp-content/themes/cocoon-master/images/b-woman.png)
では、今回はその繰り返し処理についてお伝えしましょう。
![](https://cplab.blog/wp-content/themes/cocoon-master/images/b-man.png)
お願いします!
繰り返し処理について
![](https://cplab.blog/wp-content/themes/cocoon-master/images/b-woman.png)
繰り返し処理の構文も色々とありますが、今回の繰り返し処理の構文は以下の通りです。
for 変数 in range(n):
処理1
処理2
…
![](https://cplab.blog/wp-content/themes/cocoon-master/images/b-woman.png)
意味は、「0からn-1までの各整数に対して、処理1、処理2,…を実行」という意味です。
![](https://cplab.blog/wp-content/themes/cocoon-master/images/b-man.png)
ちょっと難しいですね…
![](https://cplab.blog/wp-content/themes/cocoon-master/images/b-woman.png)
言葉だと伝わりにくいですね。
前回のプログラムを見ながら考えてみましょう。
for i in range(10):
plt.subplot(2, 5, i+1)
plt.axis("off")
plt.title(str(x.target[i]))
plt.imshow(x.images[i], cmap="gray")
![](https://cplab.blog/wp-content/themes/cocoon-master/images/b-woman.png)
まず、1行目は、変数「i」が定義されていて、n = 10となっています。
![](https://cplab.blog/wp-content/themes/cocoon-master/images/b-man.png)
iは変数のことですね
![](https://cplab.blog/wp-content/themes/cocoon-master/images/b-woman.png)
そうです。
今回は特にiには数字が代入されていないので、i = 0となっています。
![](https://cplab.blog/wp-content/themes/cocoon-master/images/b-man.png)
なるほど!
![](https://cplab.blog/wp-content/themes/cocoon-master/images/b-woman.png)
そして、今回は、n = 10となっていますが、nのことを「イテラブルオブジェクト」と呼びます。
今回は名前だけ紹介していきます。
![](https://cplab.blog/wp-content/themes/cocoon-master/images/b-man.png)
分かりました!
![](https://cplab.blog/wp-content/themes/cocoon-master/images/b-woman.png)
次に、繰り返し処理の中身についてお伝えします。
処理の1行目の「plt.subplot(2, 5, i+1)」は、出力する場所を2行×5列の図のかたまりの中の、i+1番目にするという意味です。
![](https://cplab.blog/wp-content/themes/cocoon-master/images/b-man.png)
つまり、1回目は、2×5の図のかたまりの1番目のところに図を、2回目は、2番目のところに図を出力するよう指定するということですね。
![](https://cplab.blog/wp-content/themes/cocoon-master/images/b-woman.png)
その通りです。
次に、「plt.axis(“off”)」は、軸を表示しないという意味です。
今回はグラフではなく手書きの数字を表示するので、軸を表示しないように「off」にしてます。
![](https://cplab.blog/wp-content/themes/cocoon-master/images/b-man.png)
なるほど!
![](https://cplab.blog/wp-content/themes/cocoon-master/images/b-woman.png)
次に、「plt.title(str(x.target[i]))」は、それぞれの図にタイトルをつけるという意味です。
「0」の手書き数字の上には「0」、「1」の手書き数字の上には「1」とタイトルを表示するということです。
![](https://cplab.blog/wp-content/themes/cocoon-master/images/b-man.png)
分かりました!
![](https://cplab.blog/wp-content/themes/cocoon-master/images/b-woman.png)
最後に、「plt.imshow(x.image[i], cmap=”gray”)」ですが、これは、実際に手書きの数字を出力するという命令です。cmap=”gray”はグレースケールで表示するという意味です。
![](https://cplab.blog/wp-content/themes/cocoon-master/images/b-man.png)
これで画像が表示されるわけですね!
- 繰り返し処理の文のひとつ=for 変数 in range(n):
- plt.subplot(x, y, i)=x行×y列のI番目に画像表示を指定
- plt.axis(“off”)=軸を表示しない
- plt.title(str(x.target[i]))=i番目の画像に「i」のタイトルを入れる
- plt.imshow(x.images[i], cmap=”gray”)=手書きの数字「i」の画像をグレースケールで表示する
まとめ
![](https://cplab.blog/wp-content/themes/cocoon-master/images/b-woman.png)
今回は繰り返し処理についてお伝えしました。
![](https://cplab.blog/wp-content/themes/cocoon-master/images/b-man.png)
他にも繰り返し処理の方法はあるのですか?
![](https://cplab.blog/wp-content/themes/cocoon-master/images/b-woman.png)
今回はAIを作るのに必要な繰り返し処理についてお伝えしましたが、他にも繰り返し処理の構文はあるので調べてみてくださいね。